Showing posts with label DIY. Show all posts

Thursday, October 13, 2011

Fall Favorites

I look forward to all things fall.  Halloween especially is on top of my why I love fall list:  a fun holiday to get dressed up and go hunting from neighbor to neighbor for the best candy, the pumpkins, the leaves, the colors...breathtaking.  I love the cooler days and even cooler nights, I like not paying for air conditioning...etc., etc.  I REALLY love the decorating. There are so many ways to go...scary, fun, kooky, zany, spooky and the list goes on.  I decorate kid friendly.
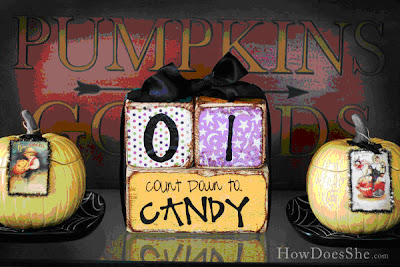
 
From How Does She.com   LOVE them!!!
My kids like to know how many days till they can go door to door for candy, so I created the "Candy Countdown" courtesy of HoWDoesShe.com.  I couldn't find current directions on their site, but I personally kept them from the past, just in case.  By the way, may I say those ladies over there are AWESOME.  Super-dee-duper crafty!!

These blocks are pretty popular now a days so you can find the directions on any great crafters site...that's why they are here now (chuckles here)  When I made my countdown I used a 4x4 and a 2x4, not the entire thing, just some of each.  I cut the 4x4 into cubes, approximately 3 1/2 inches and the 2x4 is about  6&13/16.  I know that because the hubz told me.  I figured it was about 7 inches, but he knows precise measurements so I asked him for you perfectionists out there...I know you like to be accurate :o)

A photographer I am not!  Darn flash, ruined yet another pic
Step 1: Prepare your block, sand until desired smoothness and then paint all sides with your color of choice. Use a black sponge brush and acrylic craft paint. Apply as many coats as desired. Allow to dry overnight or for at least 1-4 hours.

Step 2: Using a separate sponge brush, apply a thin layer of mod podge to the entire front side of the block. Place one square of decorative paper and press from the center out until it is smooth with no bubbles. Continue mod podging decorative squares onto each side of the cube and place the long strip onto the base's front. (12 squares and 1 long strip of decorative paper included, if KIT was purchased)

Step 3: Take your vinyl numbers and cut apart the first six numbers. Place 0, 1, 2, 3, 5, 6 to one cube in any direction you choose. Next cut apart and apply 0, 1, 2, 4, 7, 8 to the second cube. Apply "Countdown" to the base. The number 6 also serves as the number 9.

Step 4: Using your mod podge, completely coat entire cube and base, it is handy to have two old cups to position the cubes in while one side dries. Continue applying mod podge until entire cube/base has been coated, allow to dry.

Your project is now complete. Be sure to allow the project to cure/dry for 7 days prior to stacking on top of each other.  Hey, get as creative as you want, but now you have the basics.  Here is a picture of my blocks.  Not too different than the example

Little better here, no flash...hey, are you digging my skull tablecloth?  I love it!
18 days 'till I'm digging through the kids candy stash while they are at school...haha!!!

Monday, October 10, 2011

Halloween YardStake Sign...almost done

Well, it's later than I wanted to post....and I'm not done, but I really didn't want to let you down, so here is my almost complete Halloween YardStake semi tutorial.  Wow, that was a LOT of words!  I want to thank many of the other bloggers out there for inspiration...I'm sorry, but I don't have any names in particular to share, if you have created a YardStake similar to mine, let me know and I'll list your name HERE.  This sign however is completely original and my own design.

First I ran out to my favorite big box wood store and picked up some wood.  I spent $11.87 for three pieces of wood- (1) 2"x8', (1) 3"x8 and (1) 4"x8.  I now have enough to wood to make another yardstake, plus.  

I actually pulled the measuring tape out on this one, only because I wanted the stake to be "big" enough...whatever that was going to be.  I decided on 41", seemed good to me.  I cut the stake part (black) 41" using my Craftsman Compound Miter Saw.  My favorite brother and sister in law got it for me last Christmas.  I think they were tired of me borrowing theirs...haha!  

I then cut my "word" signs different lengths, each one was between 14" and 12.5".  I used my 45 degree capabilities and created directional points on two of my signs.  I then sanded all of the wood lightly and started painting.  This is when I remembered to take photos....sorry, I said I would try better with this tutorial thing.  Ya gotta understand, alot of the time I get an idea in my head and then I'm totally working on the fly and wingin' it, so I didn't think to take any photos before :(


I decided what words I wanted to apply on the signs and using my trusty Cricut, I made a stencil and painted the lettering onto my signs.  Once everything was painted, I then sanded the edges for a little distressing.  I also turned my signs upside down on top of the rocks and nails and with a rubber mallet, beat the signs into the "distressing tools" getting a really worn look in the wood.  After sanding, I applied walnut stain to the edges and then quickly wiped off any excess stain.  After the stain dried, I sprayed the signs and the stake with some matte clear coat to protect everything from the weather. 


Here are the three signs ready to be attached to the stake.


Almost finished product.  I still need to add a few finishing touches, but I didn't want to disappoint my one follower...lol!  See how important you are!!!  I'll edit tomorrow once this screaming headache goes away and I can concentrate better.  I may be able to add a little humor then too...we shall see.  I still need to attach an embellishment or so and screw the signs to the stake (they are currently being held together with my favorite Gorilla Glue) I can get away with leaving the sign the way it is, but I'm a glue and screw kinda gal.  Until tomorrow.  Hope you like my version of a Halloween YardStake.

Not sure why the purple is not coming out well, but the bottom sign is purple.

Friday, October 7, 2011

Mom...I need a gift

Sounds simple enough right?  Usually, but not when you can't leave the house and oh by the way, the party is soon, in a few hours!  Ok, breathe, think, breathe...what do I have here?  I usually have some sort of stash, things I found on sale, etc.  You see, I wasn't asked to go BUY a gift...I was being asked to MAKE something in addition to the gift we already purchased.  This is both good and bad, great because that means that my children actually DO appreciate the things I create for them, BAD because now they want me to exhaust my creations on others...haha!  Off to the "scrap" wood pile.  (It's not really scrap wood, it's just wood that became smaller than when I originally purchased it.  Poor scrap wood, it sounds so cheap!)

Luckily, I found a piece of wood I could use.  Every little girl enjoys a sign with her name on it.  Currently, every little girl in my neighborhood also seems to love peace signs, so out with the Cricut and SCAL as well.  We selected the colors and off to painting I went.  I made a reverse stencil for the bazillion peace signs and the words.  After painting, I couldn't help but Stickle everything...I mean who doesn't like sparkles??  

So here you have it:  Emily's Room Sign
Cute for winging it...right?

Thursday, October 6, 2011

What's in a Blog?

I've been wanting to blog...but about what exactly?  I wasn't sure.  I want readers, subscribers and learners.  I want to share the tidbits that I've picked up along my way in this so called life, but are they interesting enough for you to want to learn, know or read about?  That has been the question.  Clearly, I decided that I was gonna jump in with both feet (well hands, I don't type with my toes..yet) and test out these bloggy waters.  I hope you find my posts interesting so that you come back daily.  My intention is to keep this updated often, I say often so you can't hold me to anything specific...haha.  Really though, I hate going to a blog only to find that they haven't updated in eons.  I'm sure that they too were well-intended to keep up, but when they don't I find it boring and that's when they lose me  A few friends have also encouraged me to do this bloggy thing, so here's to them, Thank-you, I finally did it!


I've been called a LOT of things in my life, none of course that need to be mentioned here except this:  Martha Crocker.  Who's that you say?  My nickname as a kid and probably what I should have named this blog, but that's for another day.  Ok, where was I...oh yea, how many 5th graders do you know that during summer vacation would make chocolate chip cookies, homemade pierogies, friendship bracelets and reinvent a T-shirt to be "cool" all in one day?  Well, that was me and a typical day at my house, and so I earned the name Martha Crocker.  Martha for Martha Stewart, for who I am not...I don't have a staff full of ideas...and Crocker for Betty Crocker for whom I could never be...I hate to measure things.  My friends loved coming to my house because they would always leave with something good or learn how to do something they could show their family.  I don't know how it happened, I certainly wasn't taught these things by anyone in particular, but I "wing it" often and everything turns out pretty good, well, usually.  


One more thing that is REALLY important for you to know...I'm super dee duper SARCASTIC.  Read my words like your best friend who likes to crack jokes is talking to you, cause that's how I'm writin' it.  I have one of them there singulair witty-tudes...not everyone always knows when I'm joshing around, it's more often than not, just an FYI for ya.


I'll end today with a Fall piece created by me,  I call it......yea, nothing, I'm not an artist, I don't give things names.  Anyway, here it is...enjoy your day, meet you back here tomorrow.
Happy Fall Ya'll


So, this was a piece of scrap 1x8 that I had lying around...I cut it square 8x8, which I think is really 7.5"x7.5" in lumber math, but again...I HATE TO MEASURE anything.  I painted it first with a brown umber, slapped some crackle on top then painted over it all with my favorite paint Americana's Buttermilk.  I marked the edges where I wanted to paint pumpkin orange and slapped some more crackle over top...I know I went a little wild with the crackle..oops!  So that was mistake number, I don't know, but I recovered and it didn't turn out so bad, in fact, I LIKED it!  Onto the saying, you've heard it before just like me and I love saying Ya'll so it was fittin' to have a sign that said that in my home.  I used my handy dandy Cricut machine and SCAL to cut out the words and shapes.  I used four different vinyl/contact papers on this project, all of which were FREE!!!  Rummaging through a store I found the "wood" contact paper and they gave it to me since it was badly damaged!  LOVE THAT!!  I layered the pumpkins on to the grass and the cornstalks onto the for sale sign.  I then antiqued everything using a STAZ ON inkpad then clear coated the whole shabang so it would be safe outside.  It hangs off of my mailbox, under my porch so it's pretty weather resistant, but better to be safe.  Hope you enjoyed my "tutorial"...haha, really, I'll work on this tutorial thing...truly.