I look forward to all things fall. Halloween especially is on top of my why I love fall list: a fun holiday to get dressed up and go hunting from neighbor to neighbor for the best candy, the pumpkins, the leaves, the colors...breathtaking. I love the cooler days and even cooler nights, I like not paying for air conditioning...etc., etc. I REALLY love the decorating. There are so many ways to go...scary, fun, kooky, zany, spooky and the list goes on. I decorate kid friendly.
 | ||
| From How Does She.com LOVE them!!! |
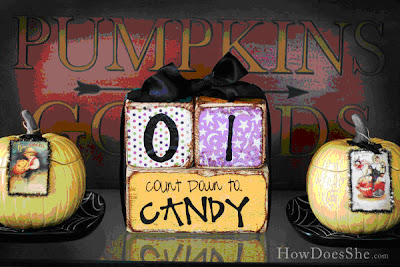
My kids like to know how many days till they can go door to door for candy, so I created the "Candy Countdown" courtesy of HoWDoesShe.com. I couldn't find current directions on their site, but I personally kept them from the past, just in case. By the way, may I say those ladies over there are AWESOME. Super-dee-duper crafty!!
These blocks are pretty popular now a days so you can find the directions on any great crafters site...that's why they are here now (chuckles here) When I made my countdown I used a 4x4 and a 2x4, not the entire thing, just some of each. I cut the 4x4 into cubes, approximately 3 1/2 inches and the 2x4 is about 6&13/16. I know that because the hubz told me. I figured it was about 7 inches, but he knows precise measurements so I asked him for you perfectionists out there...I know you like to be accurate :o)
These blocks are pretty popular now a days so you can find the directions on any great crafters site...that's why they are here now (chuckles here) When I made my countdown I used a 4x4 and a 2x4, not the entire thing, just some of each. I cut the 4x4 into cubes, approximately 3 1/2 inches and the 2x4 is about 6&13/16. I know that because the hubz told me. I figured it was about 7 inches, but he knows precise measurements so I asked him for you perfectionists out there...I know you like to be accurate :o)
 |
| A photographer I am not! Darn flash, ruined yet another pic |
Step 1: Prepare your block, sand until desired smoothness and then paint all sides with your color of choice. Use a black sponge brush and acrylic craft paint. Apply as many coats as desired. Allow to dry overnight or for at least 1-4 hours.
Step 2: Using a separate sponge brush, apply a thin layer of mod podge to the entire front side of the block. Place one square of decorative paper and press from the center out until it is smooth with no bubbles. Continue mod podging decorative squares onto each side of the cube and place the long strip onto the base's front. (12 squares and 1 long strip of decorative paper included, if KIT was purchased)
Step 3: Take your vinyl numbers and cut apart the first six numbers. Place 0, 1, 2, 3, 5, 6 to one cube in any direction you choose. Next cut apart and apply 0, 1, 2, 4, 7, 8 to the second cube. Apply "Countdown" to the base. The number 6 also serves as the number 9.
Step 4: Using your mod podge, completely coat entire cube and base, it is handy to have two old cups to position the cubes in while one side dries. Continue applying mod podge until entire cube/base has been coated, allow to dry.
Your project is now complete. Be sure to allow the project to cure/dry for 7 days prior to stacking on top of each other. Hey, get as creative as you want, but now you have the basics. Here is a picture of my blocks. Not too different than the example
 |
| Little better here, no flash...hey, are you digging my skull tablecloth? I love it! |
18 days 'till I'm digging through the kids candy stash while they are at school...haha!!!
No comments:
Post a Comment